在 Filament 中创建自定义调色板字段 - 3/3
让我们稍微美化一下我们的字段,并添加一些额外的自定义方法。
在某些情况下,你可能希望在应用中存储颜色名而不是实际的颜色代码。如果你正在构建 CMS,并且希望根据颜色的名称而不是颜色代码有条件地将类应用于元素,从而避免在标记中使用内联样式,那么这可能会很有用。
为了实现这一功能,我们将在字段中添加一个新的 storeColorName() 方法,并相应地调整字段的功能。
class ColorPalette extends Field
{
    // ...

    protected bool | Closure $shouldStoreColorName = false;

    // ...

    public function storeColorName(bool | Closure $condition = true): static
    {
        $this->shouldStoreColorName = $condition;

        return $this;
    }

    public function shouldStoreColorName(): bool
    {
        return (bool) $this->evaluate($this->shouldStoreColorName);
    }
}
并且在 Blade 视图中做些调整:
@php
    $shouldStoreColorName = $shouldStoreColorName();
@endphp

<x-forms::field-wrapper
    :id="$getId()"
    :label="$getLabel()"
    :label-sr-only="$isLabelHidden()"
    :helper-text="$getHelperText()"
    :hint="$getHint()"
    :hint-icon="$getHintIcon()"
    :required="$isRequired()"
    :state-path="$getStatePath()"
>
    <div x-data="{ state: $wire.{{ $applyStateBindingModifiers('entangle(\'' . $getStatePath() . '\')') }} }" class="flex items-center space-x-4">
        @foreach($getOptions() as $color => $label)
            @php($value = $shouldStoreColorName ? $label : $color)

            <button
                type="button"
                x-on:click="state = @js($value)"
                class="rounded-full w-8 h-8 border border-gray-300 relative inline-flex items-center justify-center"
                x-bind:class="{
                    'ring-2 ring-gray-300 ring-offset-2': state === @js($value),
                }"
                style="background: {{ $color }}" title="{{ $label }}"
            >
                <span class="sr-only">
                    {{ $label }}
                </span>

                <span x-show="state === @js($value)" x-cloak>
                    <x-heroicon-o-check class="w-4 h-4 text-gray-400" />
                </span>
            </button>
        @endforeach
    </div>
</x-forms::field-wrapper>
现在当选择一个选项时,它将使用颜色的名称而不是颜色代码。
允许选择额外的颜色
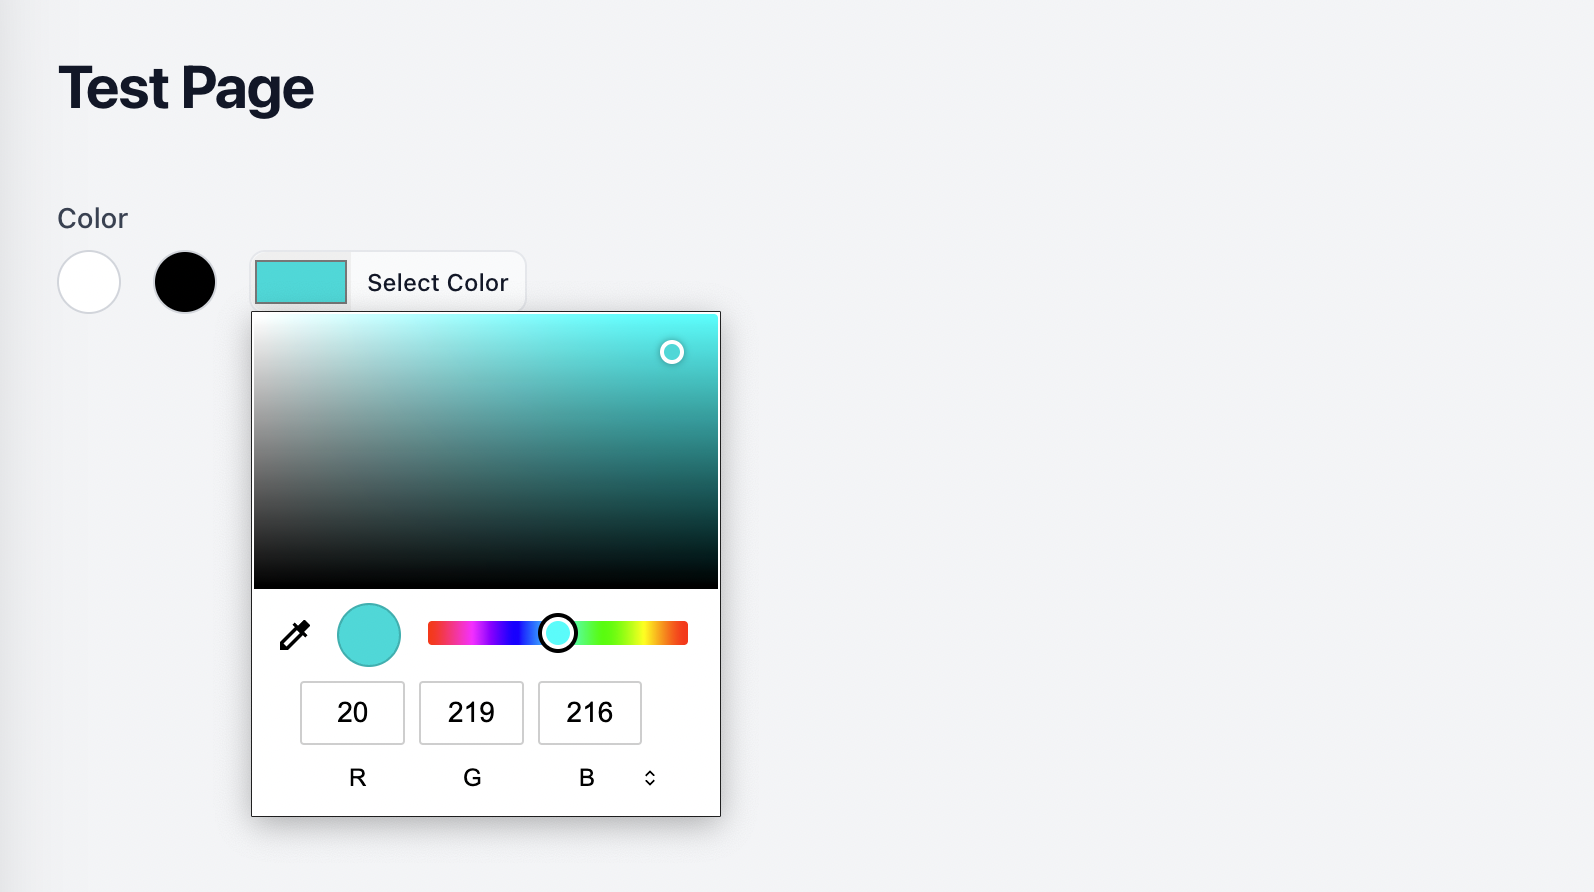
在某些情况下,你可能希望用户选择自己的颜色。现代网络浏览器提供了一种颜色选择器(Color picker) input 类型,我们可以用它来实现这一功能。
让我们从添加一个类似于前面的方法开始:
class ColorPalette extends Field
{
    // ...

    protected bool | Closure $canChooseCustomColors = false;

    // ...

    public function allowCustomColors(bool | Closure $condition = true): static
    {
        $this->canChooseCustomColors = $condition;

        return $this;
    }

    public function canChooseCustomColors(): bool
    {
        return (bool) $this->evaluate($this->canChooseCustomColors);
    }
}
再次,在 Blade 视图中做些调整:
@php
    $shouldStoreColorName = $shouldStoreColorName();
@endphp

<x-forms::field-wrapper
    :id="$getId()"
    :label="$getLabel()"
    :label-sr-only="$isLabelHidden()"
    :helper-text="$getHelperText()"
    :hint="$getHint()"
    :hint-icon="$getHintIcon()"
    :required="$isRequired()"
    :state-path="$getStatePath()"
>
    <div x-data="{ state: $wire.{{ $applyStateBindingModifiers('entangle(\'' . $getStatePath() . '\')') }} }" class="flex space-x-4">
        @foreach($getOptions() as $color => $label)
            @php($value = $shouldStoreColorName ? $label : $color)

            <button
                type="button"
                x-on:click="state = @js($value)"
                class="rounded-full w-8 h-8 border border-gray-300 relative inline-flex items-center justify-center"
                x-bind:class="{
                    'ring-2 ring-gray-300 ring-offset-2': state === @js($value),
                }"
                style="background: {{ $color }}" title="{{ $label }}"
            >
                <span class="sr-only">
                    {{ $label }}
                </span>

                <span x-show="state === @js($value)" x-cloak>
                    <x-heroicon-o-check class="w-4 h-4 text-gray-400" />
                </span>
            </button>
        @endforeach

        @if($canChooseCustomColors() && ! $shouldStoreColorName)
            <div class="flex border bg-gray-50 rounded-lg">
                <input type="color" name="{{ $getStatePath() }}.custom" x-model.lazy="state" class="block h-full p-0 rounded-l-lg">
                <div class="text-xs font-medium px-2 inline-flex items-center">
                    <span>Select Color</span>
                </div>
            </div>
        @endif
    </div>
</x-forms::field-wrapper>
Alpine.js 正在处理颜色输入的状态变化,通过一些样式,我们可以让它看起来像一个单一的输入。
在这里,我们应该添加一个方法,让你可以更改自定义颜色选择器的标签。
class ColorPalette extends Field
{
    // ...

    protected string | Closure $customColorLabel = 'Select Color';

    // ...

    public function customColorLabel(string | Closure $label): static
    {
        $this->customColorLabel = $label;

        return $this;
    }

    public function getCustomColorLabel(): string
    {
        return (string) $this->evaluate($this->customColorLabel);
    }
}
并更新 Blade 视图:
@php
    $shouldStoreColorName = $shouldStoreColorName();
@endphp

<x-forms::field-wrapper
    :id="$getId()"
    :label="$getLabel()"
    :label-sr-only="$isLabelHidden()"
    :helper-text="$getHelperText()"
    :hint="$getHint()"
    :hint-icon="$getHintIcon()"
    :required="$isRequired()"
    :state-path="$getStatePath()"
>
    <div x-data="{ state: $wire.{{ $applyStateBindingModifiers('entangle(\'' . $getStatePath() . '\')') }} }" class="flex space-x-4">
        @foreach($getOptions() as $color => $label)
            @php($value = $shouldStoreColorName ? $label : $color)

            <button
                type="button"
                x-on:click="state = @js($value)"
                class="rounded-full w-8 h-8 border border-gray-300 relative inline-flex items-center justify-center"
                x-bind:class="{
                    'ring-2 ring-gray-300 ring-offset-2': state === @js($value),
                }"
                style="background: {{ $color }}" title="{{ $label }}"
            >
                <span class="sr-only">
                    {{ $label }}
                </span>

                <span x-show="state === @js($value)" x-cloak>
                    <x-heroicon-o-check class="w-4 h-4 text-gray-400" />
                </span>
            </button>
        @endforeach

        @if($canChooseCustomColors() && ! $shouldStoreColorName)
            <div class="flex border bg-gray-50 rounded-lg">
                <input type="color" name="{{ $getStatePath() }}.custom" x-model.lazy="state" class="block h-full p-0 rounded-l-lg">
                <div class="text-xs font-medium px-2 inline-flex items-center">
                    <span>{{ $getCustomColorLabel() }}</span>
                </div>
            </div>
        @endif
    </div>
</x-forms::field-wrapper>
这样我们就完成了。一个非常强大和有用的 ColorPalette 字段,可以让你从固定的选项列表中选择一种颜色,也可以选择你自己的自定义颜色。
希望你觉得这个系列很有帮助,并学到了一点东西。
如果你想在自己的项目中使用这个字段而不重新构建它,它可以在 GitHub 上免费获得。你可以在 Github 仓库中找到安装和使用说明。


 上一篇
上一篇 
 QQ 空间
QQ 空间
 QQ 好友
QQ 好友
 微博
微博